The History and Recipe Behind the Camp Classic: “Longenecker Lumps”
 Make some for yourself and taste the tradition!
Campers young and old can recall the smell of frying dough, the taste of cinnamon sugar, and the excitement upon seeing Steve Longenecker with his “lump cooking supplies” at camp. Though campers today will often cook these simple doughnut-like treats during free-time at camp with Steve, they are a favorite among those who have ever had the pleasure of being on one of Steve’s climbing trips, and are remembered as a “backcountry cooking” classic at Falling Creek. I’m sure the alumni reading this now can remember the wonderful smell and taste of these treats – but you might have wondered, how did Longenecker Lumps come to be?
 Steve announcing that it’s “Lump Day” at Morning Assembly!
The legendary Steve Longenecker has been a long time outdoor educator, nature enthusiast, falconer, rock climber, and “lump chef” at Falling Creek since 1975. Steve shared that his “lump recipe” was born during a backpacking trip in the 60s. “A long, long time ago, back when there were real hippies running around (ask your parents about them) and before Falling Creek Camp existed, I worked at Camp Mondamin, one of our neighbors down on Lake Summit,” Steve recalls. “I was on a hiking trip with some boys and we were camping in the Shining Rock area. We had some leftover bacon grease in a small metal can and some left-over biscuit mix. I heated up the grease, dropped in a glob of dough and ‘Longenecker Lumps’ were born!” Steve brought the recipe from his time at Camp Mondamin, to Camp Sequoyah, and finally to us at Falling Creek.
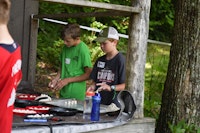
 Even decades later, Longenecker Lumps are still a favorite treat among campers
These days, in a single afternoon, you’ll see Steve and several enthusiastic campers making hundreds of these sugar coated lumps to share. The boys learn how to mix the biscuit-like dough, form it into “lumps,” fry it like a doughnut hole, and cover it in brown sugar and cinnamon. They are warm, soft, sugary, and as you can imagine they don’t last long. Boys around camp will line up to try one (or three), tasting the tradition. Even Yates Pharr remembers his first Longenecker Lump. “It was in 1979 and I had just finished a 5-day backpacking trip in Linville Gorge with Chuck McGrady (our previous Falling Creek Camp Owner/Director for 17 years). Our team had just met up with Steve and his group of climbers coming off of Table Rock, North Carolina. Steve cooked up a batch of his famous Longenecker Lumps, and man, they were good!”
Longenecker Lumps are still a familiar tradition of camp’s that Steve hopes to leave as his “lump legacy.” Though the concept is as simple as mixing and frying a few ingredients, Steve’s favorite part about the entire process is seeing the boys teach each other things that he has taught them. This sharing of knowledge is what the traditions at camp are all about, and once taught, the boys can continue to pass on that flame for years to come. With Steve’s own recipe below, now you can enjoy cooking and sharing Longenecker Lumps at home, or on your own backpacking trips!

Longenecker Lumps Recipe
What do you need?
- Cooking Pot (# 10 can or old cooking pan – 3qts)
- Large slotted spoon
- Pot clamp or hot pad (You’re cooking with very hot oil)
- A mixing bowl for the dough, container for the raw lumps, and a skillet for the cooked lumps.
- Small box of “Bisquick” dry biscuit mix.
- Liter of cooking oil
- Table sugar
- Cinnamon
How do you cook them?
Put Bisquick mix in a mixing bowl, being sure to leave some in the box. Sometimes, you need to add more mix to keep the dough from becoming sticky.
Add water to the dry mix and mix it around until you have a big lump of dough in your bowl that is not too dry or too wet. Play with this until you have a glob of mix that is about softball size and is the right consistency (too dry, it won’t hold together; too wet, it’s all yucky!) You’ll also notice how clean your hands are, now that you have been playing with the dough a while.
Now it is time to pinch the dough into the perfect-sized “Lump”. Roll each one around between your palms until it is formed just right. What size is “just right”? About the size of a large grape, marble or a very small soccer ball is fine. Too large and they’ll be raw on the inside; too little and they’ll burn up in the oil.
Now it’s time to heat the oil. Have your pot clamp or pad ready, just in case you need to move the hot oil. When you think the oil is hot enough, take your slotted spoon and gently roll a “test lump” into the hot oil. Never drop one into the oil so that it splashes on you. Hot oil burns!
If the oil is hot enough, the “lump” will float to the top and cook there until the right color; if the oil is not hot enough, it will sink to the bottom of the pan.
When the oil is just right, gently add more raw “lumps” to the cooking oil and let them cook until it’s time to roll them in the sugar/cinnamon mixture.
As you take them out of the hot oil, drain them so that the oil goes back into the cooking pot. Now, put them into the cinnamon/sugar mixture, roll them around, then eat!
